Sunday, February 6, 2011

My Android Experience, so far!

Yesterday I bought a new smartphone, the new Nexus S from Samsung. The phone looks pretty good. It has amazing features that make this phone unique. It has beautiful look, it's pretty light, and overall its hardware features makes it faster and useful. Besides its hardware, this phone comes with the lastest Android OS, the Gingerbread 2.3.2 version. I'm really surprised all the available Apps you can download from the Android market. So far, I've downloaded about 25 Apps in just one day of use. You can find on Android market Apps that you never think will work on a phone. I'm in shock mainly with one that measures your heart rates. It's amazing.

Before changing to this technology, I was a Blackberry user. The only feature that I miss from Blackberry is its own pre-built IM, which is the Blackberry Messenger. I got really used to it because I constantly chatted with my family through it. But after viewing all the great features the Android platform has, it's hard to go back to Blackberry. I personally think that Google has made a great work, and we're definitely in other times.

I feel sorry for my family, girlfriend, and friends, but I simply got stuck with this phone and Android platform :)

By the way, I wrote this post by using the Blogger App from Google and my Android phone.


Thursday, January 20, 2011

Yeah, I'm Still on my Blog

For the last 4 months, I've been working a lot on new projects from which I have learned a bunch of technologies. I have been working independently for a company doing some development on Java (Backend) and Adobe Flex (Frontend). This project has been one of the major challenges that I have had so far. I've got so many things to write about, but I haven't had enough time to write them down. I will try to do it in the next few days and weeks.

In addition to the Java & Flex project, I also got a project in which I had to learn how to do development for iPhone / iPad. I had to learn the basic core of objective-C, and how the MVC pattern works for Cocoa Apps on iPhone.

It has been interesting months. I will post my experience on these projects as soon as I have little time to do it. In the meantime, keep working and have fun!!!

Tuesday, July 6, 2010

Building High Performance Enterprise Java Applications with Spring Roo

I was told about a tool that has been out for a while to build High Performance Enterprise Java Applications. Its name is Spring Roo. I've been playing around with this tool, and I find it very productive, usable and learnable. It's amazing how you can build a Java Web-based applications by just running 10 commands. This post will show the basic steps of how to build High Performance Enterprise Java Applications with Spring Roo, but after that, I will talk a little bit more about Spring Roo Architecture and Add-ons features, and additionally, I will guide you on how to create and debug a Spring Roo Java Web-based Application.

Spring Roo Architecture

Spring Roo is based on different technologies that support both back-end and front-end solutions. Roo includes technologies such as Java Persistence API (JPA), Spring Framework dependency injection and transactional management, JUnit tests, a Maven build configuration and MVC-based front-end that uses JSP to represent information to the end users. The Spring Roo version 1.1.0.M1 includes support for GWT, which will help you create the front-end web-based solution using the architecture used by Google Production Applications. GWT on Spring Roo version 1.1.0.M1 is not completely supported. Features like field reference and browser history are not still set up for GWT on the current version.

Add-Ons Features

Spring Roo distribution provides two major components, the "Roo Core" and the "Roo Add-ons". You will find more information about Spring Roo base Add-Ons on Spring Roo Reference documentation. Using Spring Roo Add-ons commands will help you create a web-based Java Application quickly and easily.

Creating and Debugging a Spring Roo Java Web-based Application

Creating and debugging and Spring Roo application is easy and quick. The following will guide you on how to create Spring Roo Java Web-based application in a few steps:

  1. Download and install Spring Roo. You might download SpringSource Tool Suite to edit your code after created. Once you have downloaded it, install it.
  2. You might want to add roo core command--roo.sh for Unix and roo.bat for Windows systems-to your PATH environment variable. This will help you avoid typing the absolute path every time you want to run roo core.
  3. After having completed the steps above, open a shell console and create a folder called Acme. This folder will hold the project files for the Acme project. After creating the folder, get in it to start creating the Spring Roo application.
  4. Type roo.sh for Unix or roo.bat for Windows. After having run roo core command on the console, start type--or copy & paste--the following roo add-ons commands:
  5. //This command will create Java Maven-based project with all dependencies and artifacts needed
    project --type java.lang.Integerproject --topLevelPackage com.acme --projectName Acme

    //This command will set up persistence layer in your project with several aspects
    persistence setup --provider HIBERNATE --database HYPERSONIC_IN_MEMORY
    //This command will create a domain object--POJO--with integrated unit test
    entity --class ~.server.domain.Client --testAutomatically

    //This commands below will add fields to the Client POJO added above
    field string --fieldName firstName --sizeMax 25
    field string --fieldName lastName --sizeMax 25 --notNull
    field date --type java.util.Date --fieldName dateOfBirth --notNull
    //This command will create Web MVC controllers for all JPA entities
    controller all --package com.acme.web

    In addition to creating Web MVC controllers using JPSX, you can additionally set up scaffold GWT front-end views to interact with you back-end solution.

    //This command will create a front-end solution--Model-Acivity-DTO.
    gwt setup
    Now that everything is almost done, we can optionally install logging in the application to observer the behavior of itself.

    //This command will setup logging in debug mode
    logging setup --level DEBUG
  6. After installing logging, quit roo shell console and run the project using either tomcat or GWT on debug mode. To do this, just type mvn tomcat:run or mvn gwt:run if you want to debug either on tomcat or gwt dev mode.

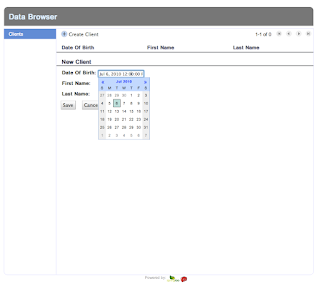
Now you should be ready to start entering and listing data by either using Spring Web-based MVC Framework or GWT scaffold solution. The following are a couple of screenshots of how you result will look like

Spring Web-based MVC Framework


GWT Scaffold Solution


I hope this little tutorial will be useful for you. Even though some features for GWT need to be developed, Spring Roo will help us build Java Web-based application quick and easy. I'm pretty sure that new features and support will be added in the versions to come.

Wednesday, April 14, 2010

Don't Start Up Oracle Instance as Root User in Unix

It's been a while since I stopped blogging. That is because I've been quite busy this semester with school and work. Right now, I'm taking some classes at the Houston Community College in order to get a MSA (Marketable Skills Achievement Certificate) in Oracle Database Administration as well as a MSA in Java Development.

About 1 months ago, when I was doing one of my Oracle Administration practices, I started up the Oracle Database instance as a root user. After having started up the instance, I started up the Enterprise Management Console (Web-based Oracle Configuration Management Tool), but it didn't get up because the oracle process couldn't log information about the initialization of the EM Console.

I called my instructor to help me out with this problem, and after checking out, we realized that some of the $ORACLE_HOME directories had different permissions because I had started up the instance with a user that doesn't belong to the DBA users.

When you install Oracle Database, you need to set up the OS Environment and create OS users that will perform Oracle Installation. I couldn't get the EM Console up because I previously started up the Oracle Database instance with OS root user, which didn't have written permissions in $ORACLE_HOME directories. In other words

"DO NOT START UP THE ORACLE DATABASE INSTANCE LOGGING IN AS ROOT USER AT LEAST THE ROOT USER BELONGS TO THE OS DB USER GROUP"

Tuesday, November 17, 2009

Problems running GWT after Upgrading to Mac OS Snow Leopard 10.6.2?

This morning, I tried to show one of my classmates all the work that I've been doing with GWT concerning the GWT Adempiere project. Once I started up the project on Eclipse, I realized that an exception was thrown up and the project didn't launch up.

Invalid memory access of location 00000010 eip=931cf77b

After searching on the Internet about this issue, I found an useful article that tells about what the problem is and also explains how to work around on this problem. All that you have to do is to download the Webkit.app and to follow the steps explained on this post.


That worked for me and now I'm able to work with GWT on my Mac by using Snow Leopard 10.6.2 and Safari 4.0.4.

Thursday, November 12, 2009

Twelve Principles of Agile Software

I've been asked to read some information about a software company and its leaders. While I was reading this information, I found an article that talks about Twelve Principles of Agile Software development. I found this article interesting and I think you might be interested too. Reading this article won't take you a lot of time, and I think you can read it in about 5 minutes.

I invite you to read this article and take deeply consideration in these practices. These practices have made the authors successful in building software. If you want to be successful in developing software, these practices can help you build software effectively and efficiently. Click on Twelve Principles of Agile Software to take a look at it.

Tuesday, September 29, 2009

GWT & Java 6 are Now Working under Snow Leopard

On my previous article GWT does not Work with Snow Leopard, I wrote about some issues that I faced with the new version of Mac OS X, Snow Leopard, and GWT framework. To refresh your memory, GWT framework does not work with Mac OS Snow Leopard because Mac OS Snow Leopard cames up with a 64-bit Java version by default, which is not compatible with GWT 1.7.0 and even any version of GWT.

With the new official release of GWT 1.7.1, now you can run GWT and Java 6 by using Java command line argument -d32 when you start GWT in hosted mode. For example, if you're using Google Plugin for Eclipse, you can add this argument on its settings, and GWT will be launched in hosted mode by using a 32-bit Java Virtual Machine.

Source: GWT 1.7.1 release fixes Mac OS X Snow Leopard issues by Andrew Bowers